> ## Documentation Index
> Fetch the complete documentation index at: https://docs.subverseai.com/llms.txt
> Use this file to discover all available pages before exploring further.
# Webhooks Integration
> Receive real-time event notifications from SubVerse AI
## Overview
Webhooks allow your applications to receive real-time notifications when specific events occur in SubVerse AI, such as call completions, workflow executions, or agent interactions. This enables you to build responsive integrations and automate workflows based on SubVerse events.
 ## How Webhooks Work
When an event occurs in SubVerse AI (like a call completing or workflow finishing), we send an HTTP POST request to your configured webhook URL with relevant event data. This enables you to:
* Track call outcomes and analytics in your systems
* Trigger downstream processes automatically
* Update your CRM or database in real-time
* Send notifications to your team
* Integrate with third-party tools
## Creating a Webhook
## How Webhooks Work
When an event occurs in SubVerse AI (like a call completing or workflow finishing), we send an HTTP POST request to your configured webhook URL with relevant event data. This enables you to:
* Track call outcomes and analytics in your systems
* Trigger downstream processes automatically
* Update your CRM or database in real-time
* Send notifications to your team
* Integrate with third-party tools
## Creating a Webhook
 ### Step 1: Navigate to Webhooks
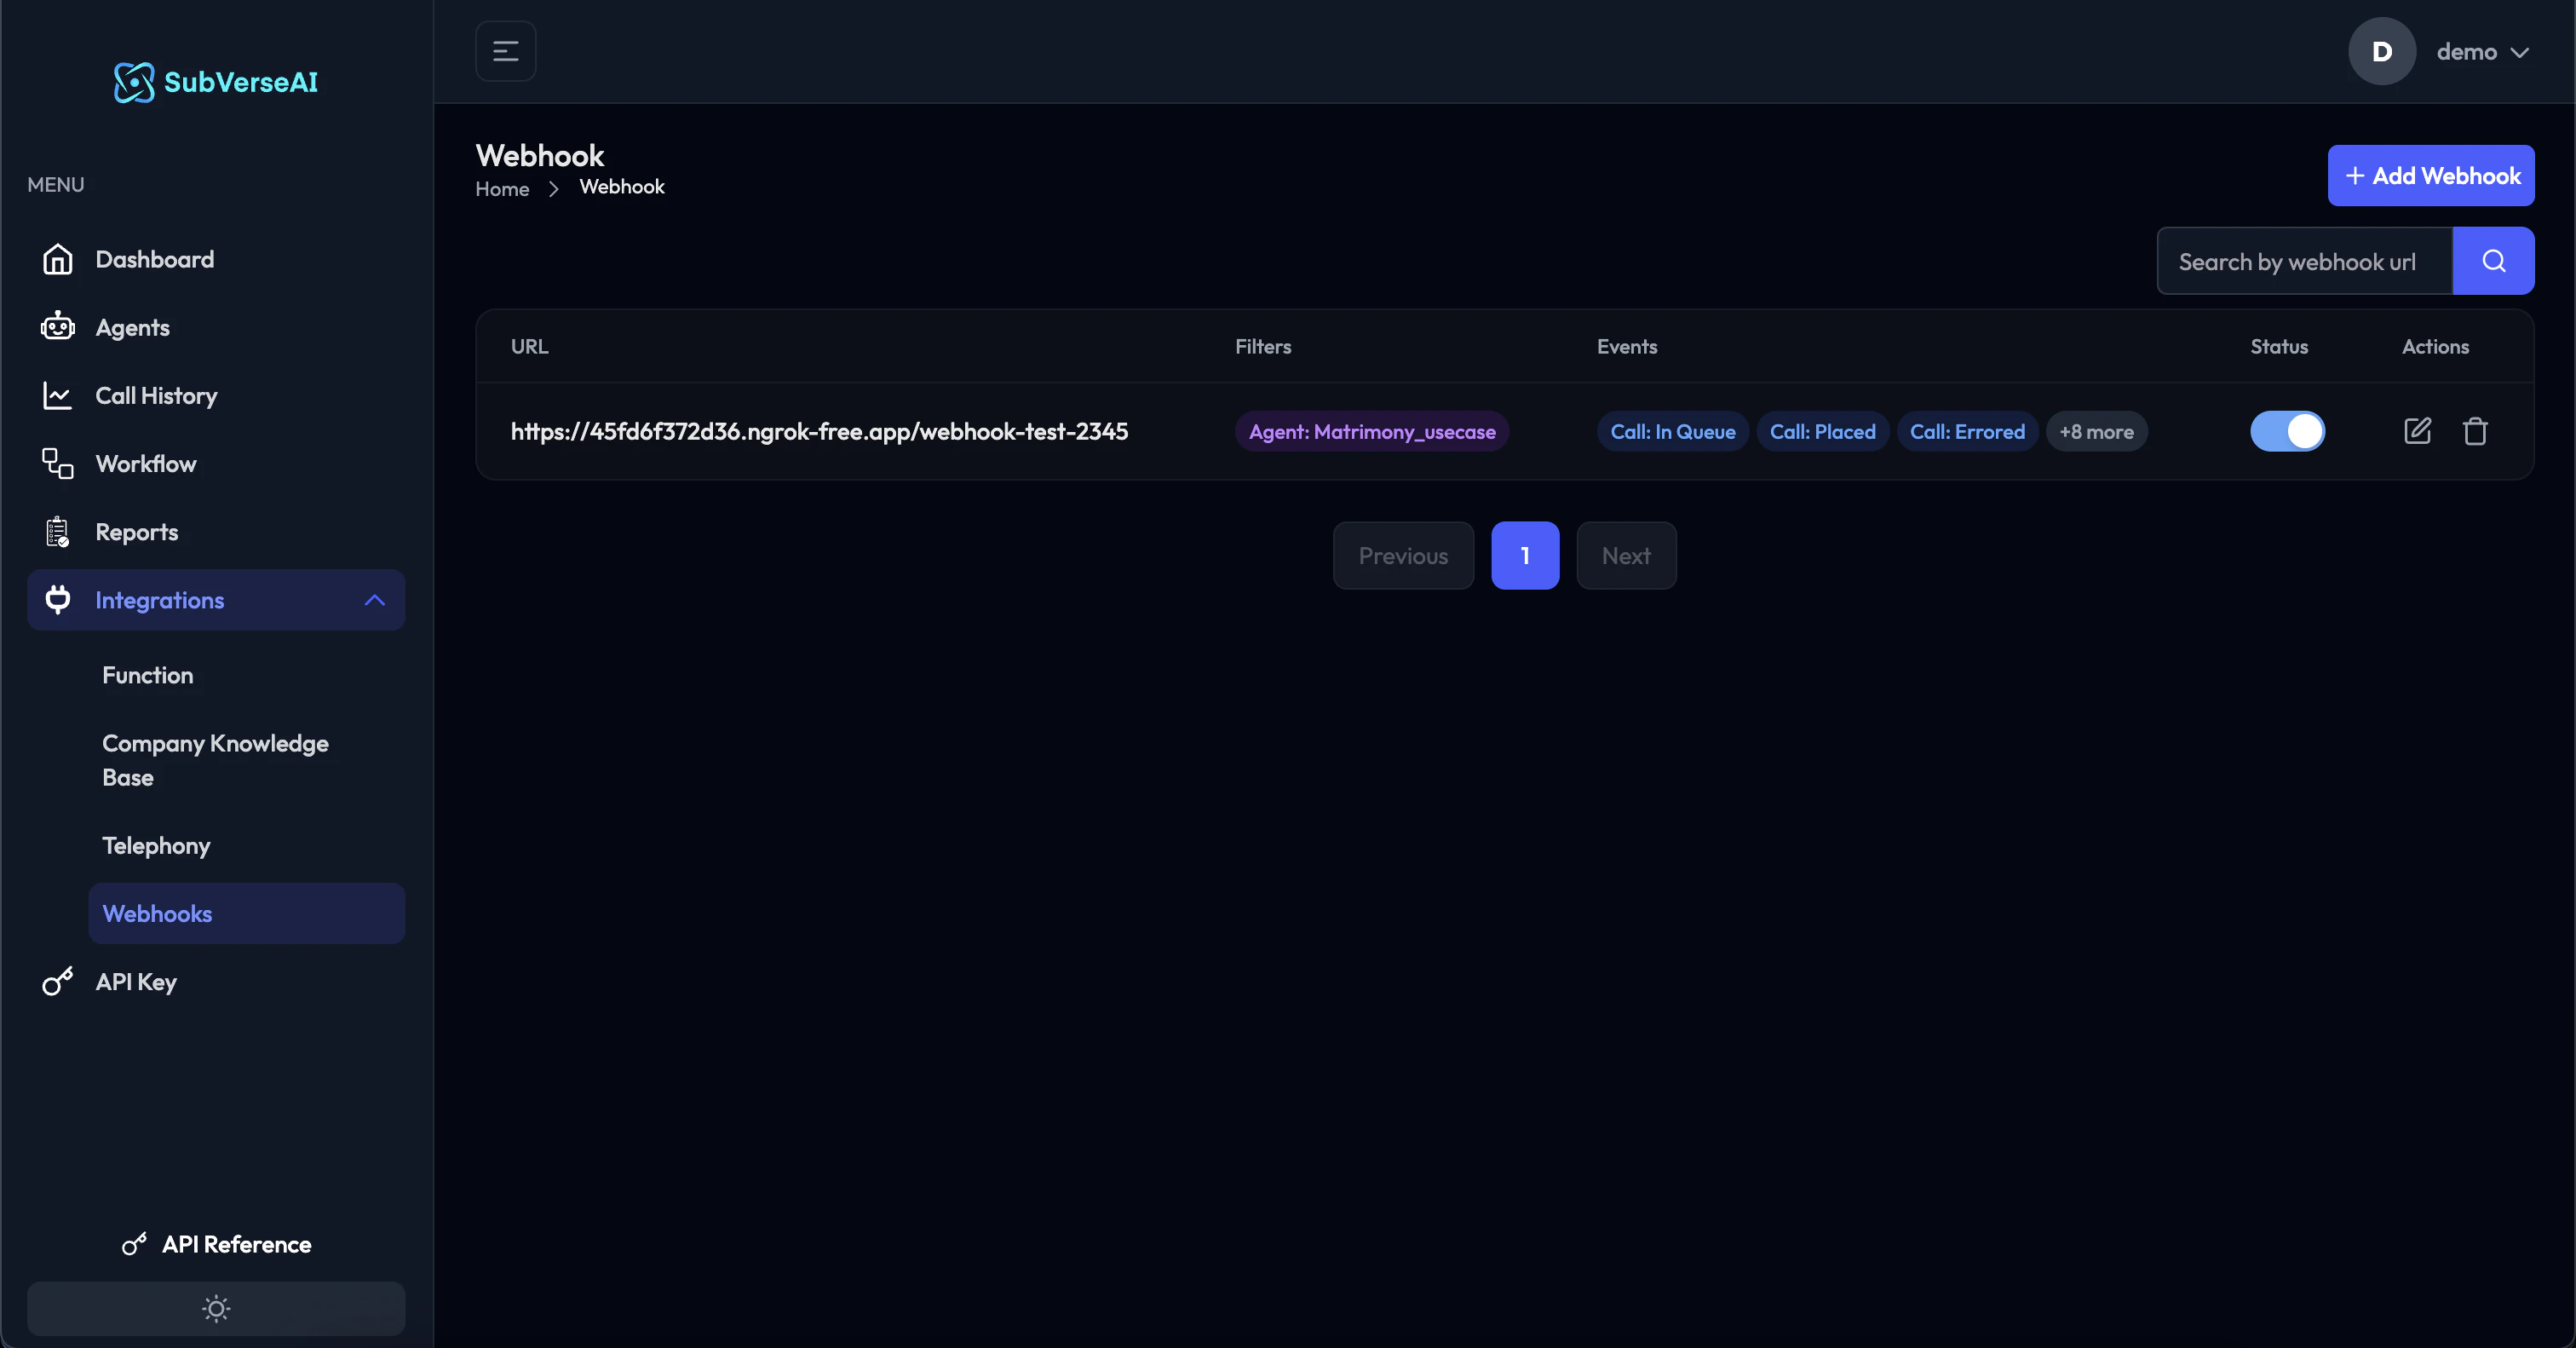
1. Log in to your SubVerse dashboard
2. Go to **Integrations** → **Webhooks**
3. Click **+ Add Webhook**
### Step 2: Configure Webhook URL
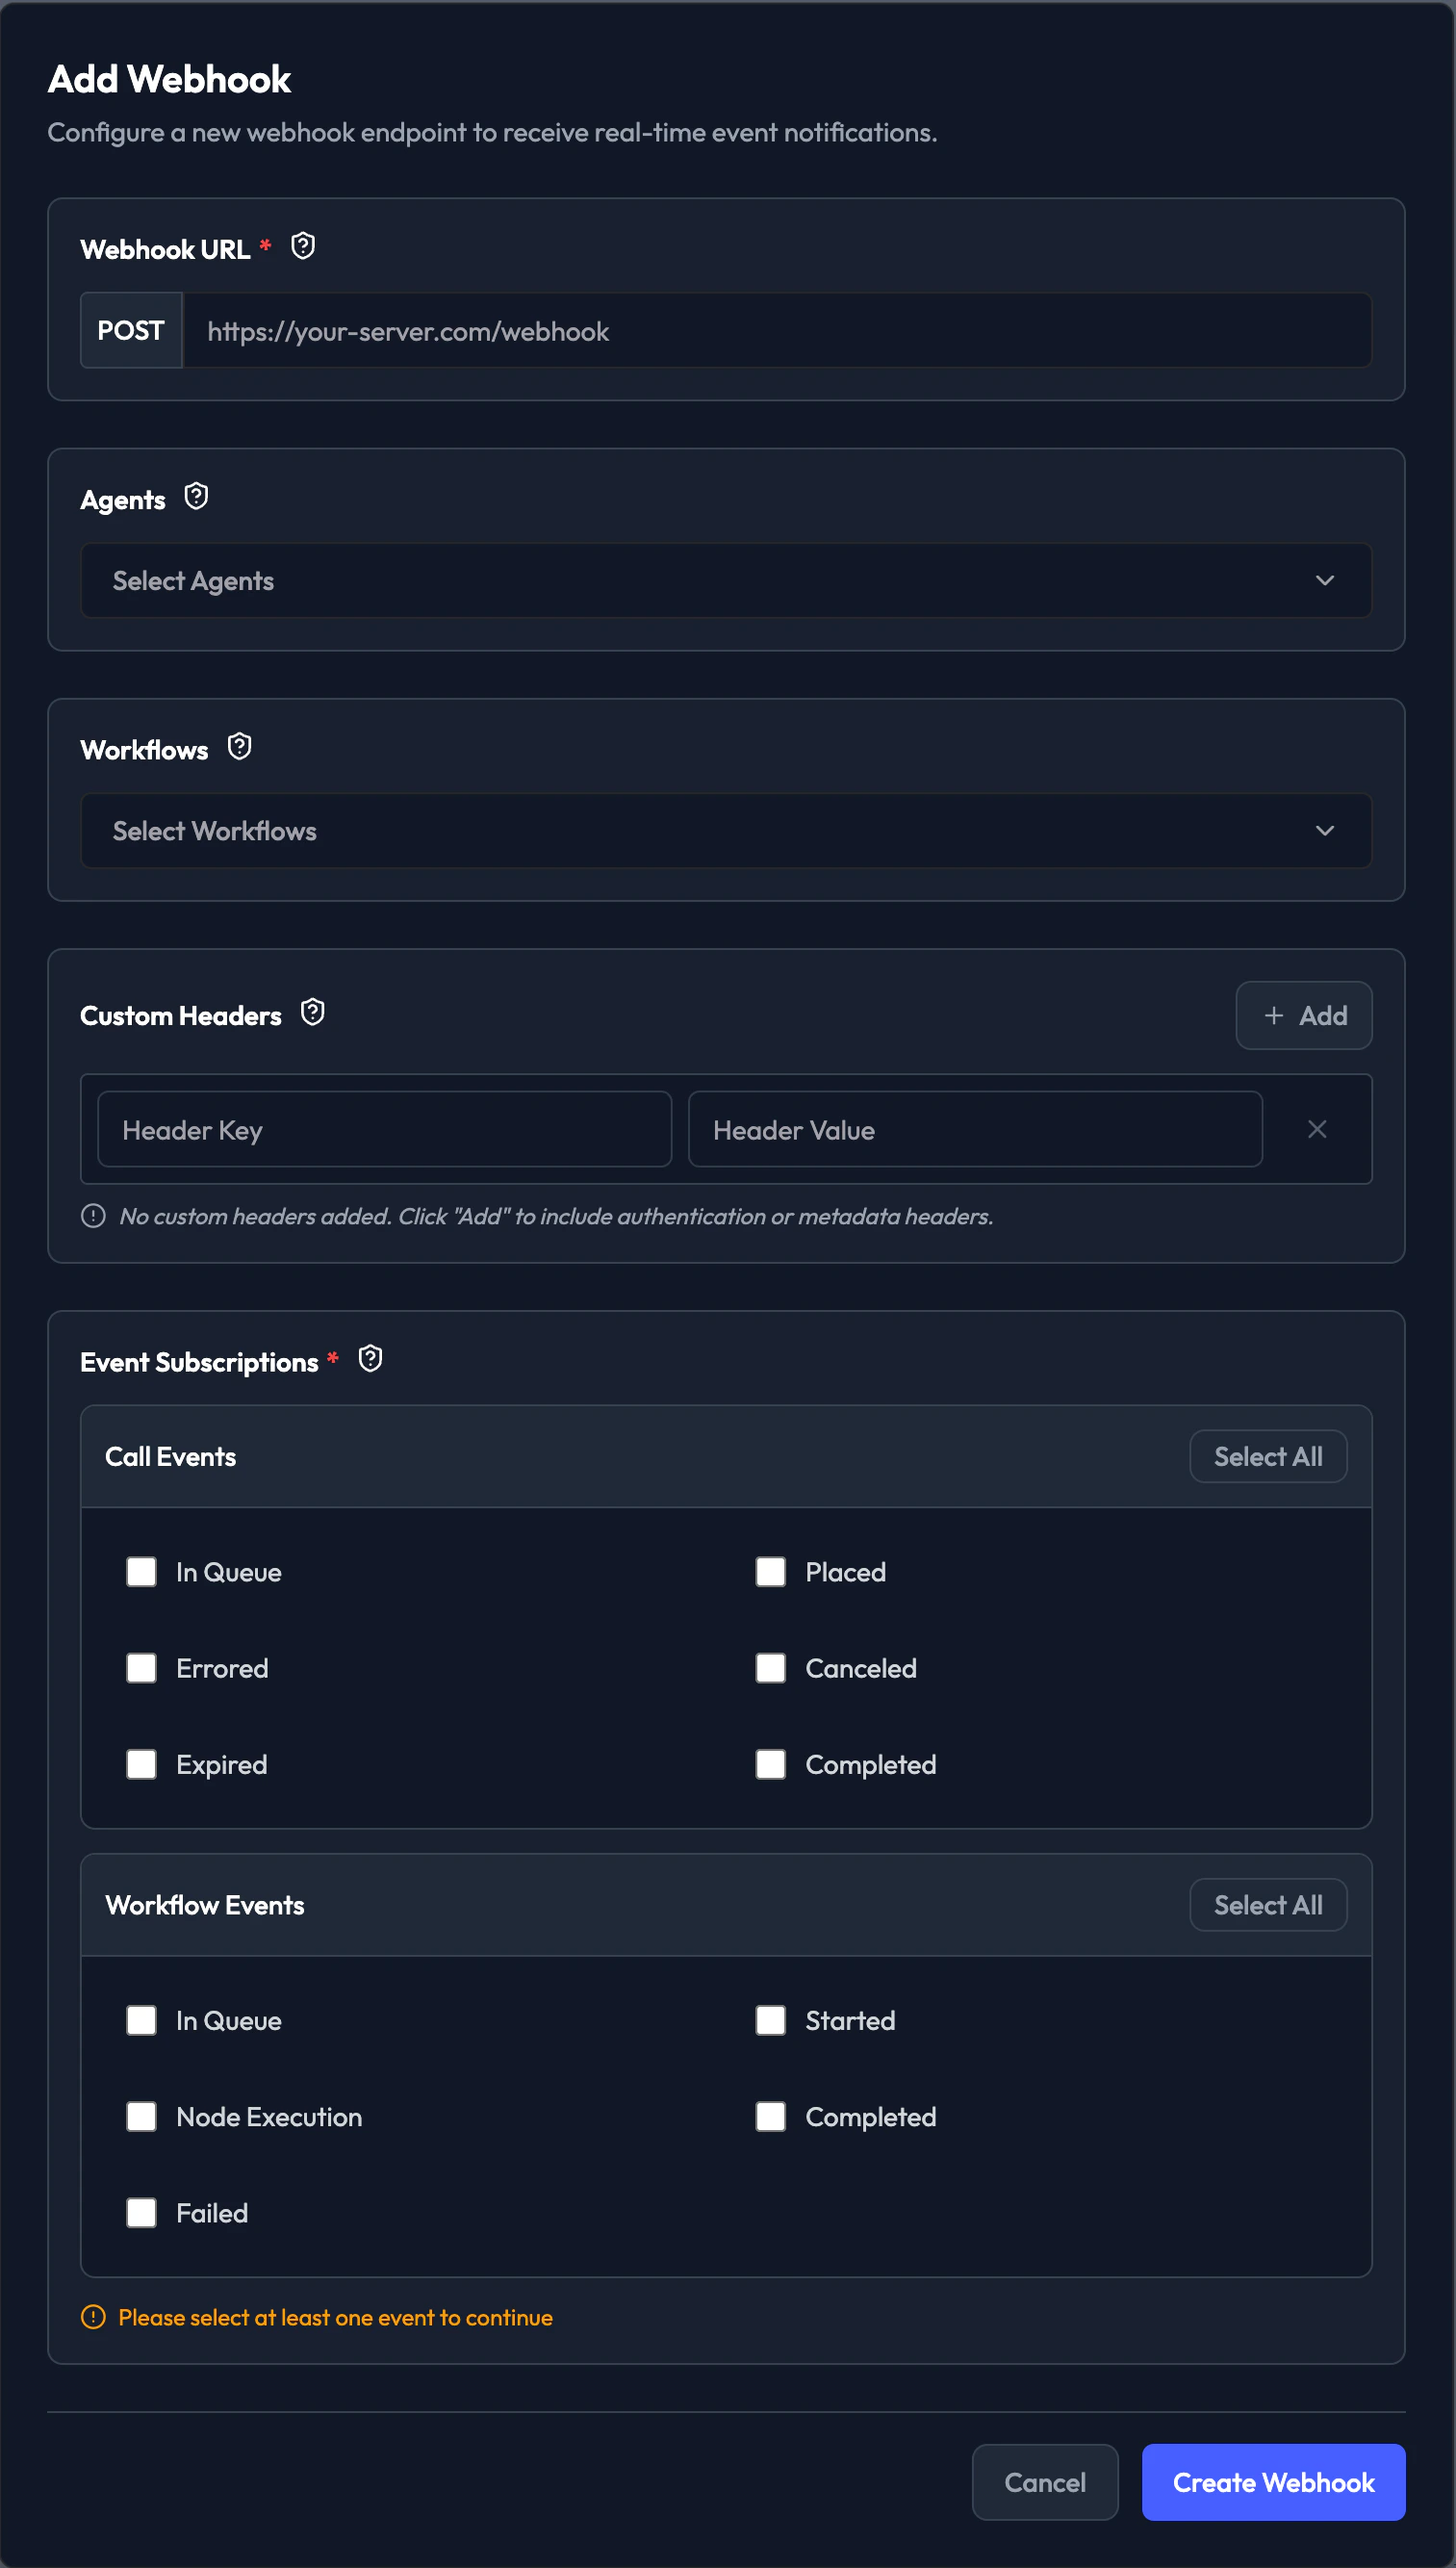
**Webhook URL**
* Enter your endpoint URL that will receive webhook events
* Must be a publicly accessible HTTPS URL
* Format: `https://your-server.com/webhook`
**Example URLs:**
* `https://api.yourcompany.com/subverse/webhook`
* `https://your-app.com/api/v1/webhooks/subverse`
* `https://hooks.zapier.com/hooks/catch/123456/abcdef`
Your webhook URL must be publicly accessible and use HTTPS. Local development URLs (localhost, 127.0.0.1) will not work in production.
### Step 3: Select Agents (Optional)
Choose specific agents whose events you want to receive:
* **Select All**: Receive events from all agents
* **Specific Agents**: Select individual agents from the dropdown
**Use Cases:**
* Monitor specific high-priority agents
* Route different agents to different endpoints
* Filter events by agent type
### Step 4: Select Workflows (Optional)
Choose specific workflows whose events you want to receive:
* **Select All**: Receive events from all workflows
* **Specific Workflows**: Select individual workflows from the dropdown
**Use Cases:**
* Track specific campaign workflows
* Monitor critical business processes
* Separate workflow events by type
### Step 5: Configure Custom Headers (Optional)
Add custom HTTP headers to webhook requests for authentication or metadata:
**Common Use Cases:**
* **Authentication**: `Authorization: Bearer your-token-here`
* **API Keys**: `X-API-Key: your-api-key`
* **Custom Metadata**: `X-Client-ID: your-client-id`
**To Add Headers:**
1. Click **+ Add** in the Custom Headers section
2. Enter **Header Key** (e.g., `Authorization`)
3. Enter **Header Value** (e.g., `Bearer abc123xyz`)
4. Add multiple headers as needed
### Step 6: Subscribe to Events
Select which events you want to receive notifications for:
#### Call Events
* **In Queue**: Call is waiting to be processed
* **Placed**: Outbound call has been initiated
* **Errored**: Call encountered an error
* **Canceled**: Call was canceled before completion
* **Expired**: Call expired (timeout)
* **Completed**: Call finished successfully
#### Workflow Events
* **In Queue**: Workflow is waiting to execute
* **Started**: Workflow execution has begun
* **Node Execution**: Individual workflow node executed
* **Failed**: Workflow execution failed
* **Completed**: Workflow finished successfully
**Selection Tips:**
* Click **Select All** to subscribe to all events in a category
* Select individual events for specific use cases
* You must select at least one event to create the webhook
### Step 7: Create Webhook
1. Review your configuration
2. Click **Create Webhook**
3. Your webhook will appear in the webhooks dashboard
4. Toggle the switch to enable/disable the webhook
## Event Payload Structure
SubVerse sends webhook events as HTTP POST requests with JSON payloads.
### Call Events Payload
```json theme={null}
{
"eventType": "call.placed",
"createdAt": "2025-12-08T10:30:00Z",
"data": {
"callId": "call_xyz789",
"customerNumber": "+91xxxxxxxxxx",
"callStatus": "call_placed",
"botNumber": "+91xxxxxxxxxx",
"agentId": "agent_123",
"agentName": "Customer Support Agent",
"callDuration": 185,
"callDirection": "outbound",
"callTime": "2025-12-08T10:27:00Z",
"transcript": "Full conversation transcript...",
"analysis": {
"sentiment": "positive",
"summary": "Customer inquiry resolved successfully",
"customFields": {}
},
"recordingUrl": "https://recordings.subverseai.com/call_xyz789.mp3"
}
}
```
### Workflow Events Payload
```json theme={null}
{
"eventType": "workflow.in_queue",
"createdAt": "2025-12-08T10:35:00Z",
"data": {
"workflowId": "wf_456",
"workflowName": "Order Confirmation Campaign",
"executionId": "exec_789",
"status": "in_queue",
"startedAt": "2025-12-08T10:30:00Z",
"completedAt": "2025-12-08T10:35:00Z",
"duration": 300,
"nodesExecuted": 5,
"results": {
"callsMade": 10,
"emailsSent": 10,
"successRate": 0.9
}
}
}
```
### Common Fields
All webhook payloads include:
* **eventType**: Type of event (e.g., `call.completed`, `call.placed`, `workflow.started`, `workflow.in_queue`)
* **createdAt**: ISO 8601 timestamp when event occurred
* **data**: Event-specific data payload with camelCase field names
## Webhook Endpoint Requirements
Your webhook endpoint must meet the following requirements:
### 1. Accept POST Requests
```javascript theme={null}
app.post('/webhook', (req, res) => {
// Handle webhook
});
```
### 2. Parse JSON Body
```javascript theme={null}
app.use(express.json());
```
### 3. Return 2xx Status Code
```javascript theme={null}
res.status(200).json({ received: true });
```
### 4. Respond Quickly
* Return response within 5 seconds
* Process heavy operations asynchronously
* Use background jobs for time-consuming tasks
## Example Webhook Endpoint
### Node.js/Express
```javascript theme={null}
const express = require('express');
const app = express();
app.use(express.json());
app.post('/subverse/webhook', async (req, res) => {
const { eventType, createdAt, data } = req.body;
// Acknowledge receipt immediately
res.status(200).json({
received: true,
eventType: eventType
});
// Process asynchronously
processWebhookAsync(eventType, data);
});
async function processWebhookAsync(eventType, data) {
try {
switch(eventType) {
case 'call.completed':
case 'call.placed':
await updateCRM(data);
await sendNotification(data);
break;
case 'workflow.completed':
case 'workflow.in_queue':
await logWorkflowResults(data);
break;
default:
console.log('Unknown event type:', eventType);
}
} catch (error) {
console.error('Error processing webhook:', error);
}
}
app.listen(3000);
```
### Python/Flask
```python theme={null}
from flask import Flask, request, jsonify
import threading
app = Flask(__name__)
@app.route('/subverse/webhook', methods=['POST'])
def webhook():
data = request.json
event_type = data.get('eventType')
created_at = data.get('createdAt')
# Acknowledge receipt immediately
response = jsonify({'received': True, 'eventType': event_type})
# Process asynchronously
thread = threading.Thread(
target=process_webhook_async,
args=(event_type, data.get('data'))
)
thread.start()
return response, 200
def process_webhook_async(event_type, data):
try:
if event_type in ['call.completed', 'call.placed']:
update_crm(data)
send_notification(data)
elif event_type in ['workflow.completed', 'workflow.in_queue']:
log_workflow_results(data)
except Exception as e:
print(f'Error processing webhook: {e}')
if __name__ == '__main__':
app.run(port=3000)
```
## Security Best Practices
### 1. Use HTTPS
Always use HTTPS endpoints to encrypt data in transit.
### 2. Validate Requests
Verify requests are coming from SubVerse:
* Check custom headers you configured
* Validate event structure
* Implement request signing (if available)
### 3. Implement Idempotency
Handle duplicate events gracefully:
```javascript theme={null}
const processedEvents = new Set();
app.post('/webhook', (req, res) => {
const { eventType, createdAt, data } = req.body;
// Use callId or workflowId + createdAt as unique identifier
const eventId = data.callId || data.workflowId + '_' + createdAt;
if (processedEvents.has(eventId)) {
return res.status(200).json({ received: true, duplicate: true });
}
processedEvents.add(eventId);
// Process event...
});
```
### 4. Rate Limiting
Protect your endpoint from abuse:
```javascript theme={null}
const rateLimit = require('express-rate-limit');
const limiter = rateLimit({
windowMs: 1 * 60 * 1000, // 1 minute
max: 100 // limit each IP to 100 requests per minute
});
app.post('/webhook', limiter, (req, res) => {
// Handle webhook
});
```
## Managing Webhooks
### Enable/Disable Webhooks
Toggle the switch in the webhooks dashboard to enable or disable a webhook without deleting it.
### Edit Webhooks
1. Click the edit icon next to the webhook
2. Modify URL, agents, workflows, headers, or events
3. Click **Update Webhook**
### Delete Webhooks
1. Click the delete icon next to the webhook
2. Confirm deletion
3. Webhook will stop receiving events immediately
### Test Webhooks
Send a test event to verify your endpoint:
1. Click the test icon next to the webhook
2. Select an event type to test
3. Check your endpoint receives the test payload
## Monitoring Webhooks
### Webhook Logs
View webhook delivery status and responses:
1. Click on a webhook in the dashboard
2. View recent deliveries
3. Check success/failure status
4. Review response codes and error messages
### Retry Logic
SubVerse automatically retries failed webhook deliveries:
* **Attempts**: Up to 3 retries
* **Backoff**: Exponential backoff (1s, 5s, 25s)
* **Status Codes**: Retries on 5xx errors and timeouts
* **Success**: 2xx status codes mark delivery as successful
## Common Use Cases
### 1. CRM Integration
Update customer records when calls complete:
```javascript theme={null}
async function updateCRM(callData) {
await crmClient.contacts.update({
phone: callData.customerNumber,
lastCallDate: callData.callTime,
callDuration: callData.callDuration,
callNotes: callData.transcript,
sentiment: callData.analysis?.sentiment
});
}
```
### 2. Team Notifications
Send Slack notifications for important events:
```javascript theme={null}
async function sendSlackNotification(callData) {
if (callData.analysis?.sentiment === 'negative') {
await slackClient.chat.postMessage({
channel: '#customer-support',
text: `⚠️ Negative call detected with ${callData.customerNumber}`,
attachments: [{
text: callData.analysis.summary
}]
});
}
}
```
### 3. Analytics Tracking
Send events to analytics platforms:
```javascript theme={null}
async function trackAnalytics(callData) {
await analyticsClient.track({
event: 'Call Completed',
properties: {
agentId: callData.agentId,
duration: callData.callDuration,
status: callData.callStatus,
sentiment: callData.analysis?.sentiment
}
});
}
```
### 4. Workflow Automation
Trigger follow-up actions based on call outcomes:
```javascript theme={null}
async function automateFollowup(callData) {
if (callData.callStatus === 'completed') {
// Send follow-up email
await sendEmail({
to: callData.analysis?.customFields?.email,
subject: 'Thank you for your call',
body: generateFollowupEmail(callData)
});
} else {
// Schedule retry call
await scheduleCallback({
customerNumber: callData.customerNumber,
scheduledTime: addHours(new Date(), 2)
});
}
}
```
## Troubleshooting
### Webhook Not Receiving Events
**Check:**
* Webhook is enabled (toggle switch is on)
* URL is publicly accessible
* Correct events are selected
* Agents/workflows are selected (if filtered)
**Solution:**
* Test URL accessibility from external service
* Verify firewall rules allow incoming requests
* Check webhook logs for delivery attempts
* Ensure endpoint returns 2xx status code
### Timeout Errors
**Check:**
* Endpoint response time
* Heavy processing in request handler
* Database query performance
**Solution:**
* Return 200 response immediately
* Move processing to background jobs
* Use async/await properly
* Optimize database queries
### Duplicate Events
**Check:**
* Retry logic triggering multiple deliveries
* Idempotency handling in your code
**Solution:**
* Implement event ID tracking
* Use database constraints for uniqueness
* Return 200 even for duplicates
## Next Steps
Use webhooks in workflows
Webhook API documentation
Monitor call events
Build automated workflows
Start with a simple webhook that logs events, then gradually add more complex processing logic as you become familiar with the event structure.
### Step 1: Navigate to Webhooks
1. Log in to your SubVerse dashboard
2. Go to **Integrations** → **Webhooks**
3. Click **+ Add Webhook**
### Step 2: Configure Webhook URL
**Webhook URL**
* Enter your endpoint URL that will receive webhook events
* Must be a publicly accessible HTTPS URL
* Format: `https://your-server.com/webhook`
**Example URLs:**
* `https://api.yourcompany.com/subverse/webhook`
* `https://your-app.com/api/v1/webhooks/subverse`
* `https://hooks.zapier.com/hooks/catch/123456/abcdef`
Your webhook URL must be publicly accessible and use HTTPS. Local development URLs (localhost, 127.0.0.1) will not work in production.
### Step 3: Select Agents (Optional)
Choose specific agents whose events you want to receive:
* **Select All**: Receive events from all agents
* **Specific Agents**: Select individual agents from the dropdown
**Use Cases:**
* Monitor specific high-priority agents
* Route different agents to different endpoints
* Filter events by agent type
### Step 4: Select Workflows (Optional)
Choose specific workflows whose events you want to receive:
* **Select All**: Receive events from all workflows
* **Specific Workflows**: Select individual workflows from the dropdown
**Use Cases:**
* Track specific campaign workflows
* Monitor critical business processes
* Separate workflow events by type
### Step 5: Configure Custom Headers (Optional)
Add custom HTTP headers to webhook requests for authentication or metadata:
**Common Use Cases:**
* **Authentication**: `Authorization: Bearer your-token-here`
* **API Keys**: `X-API-Key: your-api-key`
* **Custom Metadata**: `X-Client-ID: your-client-id`
**To Add Headers:**
1. Click **+ Add** in the Custom Headers section
2. Enter **Header Key** (e.g., `Authorization`)
3. Enter **Header Value** (e.g., `Bearer abc123xyz`)
4. Add multiple headers as needed
### Step 6: Subscribe to Events
Select which events you want to receive notifications for:
#### Call Events
* **In Queue**: Call is waiting to be processed
* **Placed**: Outbound call has been initiated
* **Errored**: Call encountered an error
* **Canceled**: Call was canceled before completion
* **Expired**: Call expired (timeout)
* **Completed**: Call finished successfully
#### Workflow Events
* **In Queue**: Workflow is waiting to execute
* **Started**: Workflow execution has begun
* **Node Execution**: Individual workflow node executed
* **Failed**: Workflow execution failed
* **Completed**: Workflow finished successfully
**Selection Tips:**
* Click **Select All** to subscribe to all events in a category
* Select individual events for specific use cases
* You must select at least one event to create the webhook
### Step 7: Create Webhook
1. Review your configuration
2. Click **Create Webhook**
3. Your webhook will appear in the webhooks dashboard
4. Toggle the switch to enable/disable the webhook
## Event Payload Structure
SubVerse sends webhook events as HTTP POST requests with JSON payloads.
### Call Events Payload
```json theme={null}
{
"eventType": "call.placed",
"createdAt": "2025-12-08T10:30:00Z",
"data": {
"callId": "call_xyz789",
"customerNumber": "+91xxxxxxxxxx",
"callStatus": "call_placed",
"botNumber": "+91xxxxxxxxxx",
"agentId": "agent_123",
"agentName": "Customer Support Agent",
"callDuration": 185,
"callDirection": "outbound",
"callTime": "2025-12-08T10:27:00Z",
"transcript": "Full conversation transcript...",
"analysis": {
"sentiment": "positive",
"summary": "Customer inquiry resolved successfully",
"customFields": {}
},
"recordingUrl": "https://recordings.subverseai.com/call_xyz789.mp3"
}
}
```
### Workflow Events Payload
```json theme={null}
{
"eventType": "workflow.in_queue",
"createdAt": "2025-12-08T10:35:00Z",
"data": {
"workflowId": "wf_456",
"workflowName": "Order Confirmation Campaign",
"executionId": "exec_789",
"status": "in_queue",
"startedAt": "2025-12-08T10:30:00Z",
"completedAt": "2025-12-08T10:35:00Z",
"duration": 300,
"nodesExecuted": 5,
"results": {
"callsMade": 10,
"emailsSent": 10,
"successRate": 0.9
}
}
}
```
### Common Fields
All webhook payloads include:
* **eventType**: Type of event (e.g., `call.completed`, `call.placed`, `workflow.started`, `workflow.in_queue`)
* **createdAt**: ISO 8601 timestamp when event occurred
* **data**: Event-specific data payload with camelCase field names
## Webhook Endpoint Requirements
Your webhook endpoint must meet the following requirements:
### 1. Accept POST Requests
```javascript theme={null}
app.post('/webhook', (req, res) => {
// Handle webhook
});
```
### 2. Parse JSON Body
```javascript theme={null}
app.use(express.json());
```
### 3. Return 2xx Status Code
```javascript theme={null}
res.status(200).json({ received: true });
```
### 4. Respond Quickly
* Return response within 5 seconds
* Process heavy operations asynchronously
* Use background jobs for time-consuming tasks
## Example Webhook Endpoint
### Node.js/Express
```javascript theme={null}
const express = require('express');
const app = express();
app.use(express.json());
app.post('/subverse/webhook', async (req, res) => {
const { eventType, createdAt, data } = req.body;
// Acknowledge receipt immediately
res.status(200).json({
received: true,
eventType: eventType
});
// Process asynchronously
processWebhookAsync(eventType, data);
});
async function processWebhookAsync(eventType, data) {
try {
switch(eventType) {
case 'call.completed':
case 'call.placed':
await updateCRM(data);
await sendNotification(data);
break;
case 'workflow.completed':
case 'workflow.in_queue':
await logWorkflowResults(data);
break;
default:
console.log('Unknown event type:', eventType);
}
} catch (error) {
console.error('Error processing webhook:', error);
}
}
app.listen(3000);
```
### Python/Flask
```python theme={null}
from flask import Flask, request, jsonify
import threading
app = Flask(__name__)
@app.route('/subverse/webhook', methods=['POST'])
def webhook():
data = request.json
event_type = data.get('eventType')
created_at = data.get('createdAt')
# Acknowledge receipt immediately
response = jsonify({'received': True, 'eventType': event_type})
# Process asynchronously
thread = threading.Thread(
target=process_webhook_async,
args=(event_type, data.get('data'))
)
thread.start()
return response, 200
def process_webhook_async(event_type, data):
try:
if event_type in ['call.completed', 'call.placed']:
update_crm(data)
send_notification(data)
elif event_type in ['workflow.completed', 'workflow.in_queue']:
log_workflow_results(data)
except Exception as e:
print(f'Error processing webhook: {e}')
if __name__ == '__main__':
app.run(port=3000)
```
## Security Best Practices
### 1. Use HTTPS
Always use HTTPS endpoints to encrypt data in transit.
### 2. Validate Requests
Verify requests are coming from SubVerse:
* Check custom headers you configured
* Validate event structure
* Implement request signing (if available)
### 3. Implement Idempotency
Handle duplicate events gracefully:
```javascript theme={null}
const processedEvents = new Set();
app.post('/webhook', (req, res) => {
const { eventType, createdAt, data } = req.body;
// Use callId or workflowId + createdAt as unique identifier
const eventId = data.callId || data.workflowId + '_' + createdAt;
if (processedEvents.has(eventId)) {
return res.status(200).json({ received: true, duplicate: true });
}
processedEvents.add(eventId);
// Process event...
});
```
### 4. Rate Limiting
Protect your endpoint from abuse:
```javascript theme={null}
const rateLimit = require('express-rate-limit');
const limiter = rateLimit({
windowMs: 1 * 60 * 1000, // 1 minute
max: 100 // limit each IP to 100 requests per minute
});
app.post('/webhook', limiter, (req, res) => {
// Handle webhook
});
```
## Managing Webhooks
### Enable/Disable Webhooks
Toggle the switch in the webhooks dashboard to enable or disable a webhook without deleting it.
### Edit Webhooks
1. Click the edit icon next to the webhook
2. Modify URL, agents, workflows, headers, or events
3. Click **Update Webhook**
### Delete Webhooks
1. Click the delete icon next to the webhook
2. Confirm deletion
3. Webhook will stop receiving events immediately
### Test Webhooks
Send a test event to verify your endpoint:
1. Click the test icon next to the webhook
2. Select an event type to test
3. Check your endpoint receives the test payload
## Monitoring Webhooks
### Webhook Logs
View webhook delivery status and responses:
1. Click on a webhook in the dashboard
2. View recent deliveries
3. Check success/failure status
4. Review response codes and error messages
### Retry Logic
SubVerse automatically retries failed webhook deliveries:
* **Attempts**: Up to 3 retries
* **Backoff**: Exponential backoff (1s, 5s, 25s)
* **Status Codes**: Retries on 5xx errors and timeouts
* **Success**: 2xx status codes mark delivery as successful
## Common Use Cases
### 1. CRM Integration
Update customer records when calls complete:
```javascript theme={null}
async function updateCRM(callData) {
await crmClient.contacts.update({
phone: callData.customerNumber,
lastCallDate: callData.callTime,
callDuration: callData.callDuration,
callNotes: callData.transcript,
sentiment: callData.analysis?.sentiment
});
}
```
### 2. Team Notifications
Send Slack notifications for important events:
```javascript theme={null}
async function sendSlackNotification(callData) {
if (callData.analysis?.sentiment === 'negative') {
await slackClient.chat.postMessage({
channel: '#customer-support',
text: `⚠️ Negative call detected with ${callData.customerNumber}`,
attachments: [{
text: callData.analysis.summary
}]
});
}
}
```
### 3. Analytics Tracking
Send events to analytics platforms:
```javascript theme={null}
async function trackAnalytics(callData) {
await analyticsClient.track({
event: 'Call Completed',
properties: {
agentId: callData.agentId,
duration: callData.callDuration,
status: callData.callStatus,
sentiment: callData.analysis?.sentiment
}
});
}
```
### 4. Workflow Automation
Trigger follow-up actions based on call outcomes:
```javascript theme={null}
async function automateFollowup(callData) {
if (callData.callStatus === 'completed') {
// Send follow-up email
await sendEmail({
to: callData.analysis?.customFields?.email,
subject: 'Thank you for your call',
body: generateFollowupEmail(callData)
});
} else {
// Schedule retry call
await scheduleCallback({
customerNumber: callData.customerNumber,
scheduledTime: addHours(new Date(), 2)
});
}
}
```
## Troubleshooting
### Webhook Not Receiving Events
**Check:**
* Webhook is enabled (toggle switch is on)
* URL is publicly accessible
* Correct events are selected
* Agents/workflows are selected (if filtered)
**Solution:**
* Test URL accessibility from external service
* Verify firewall rules allow incoming requests
* Check webhook logs for delivery attempts
* Ensure endpoint returns 2xx status code
### Timeout Errors
**Check:**
* Endpoint response time
* Heavy processing in request handler
* Database query performance
**Solution:**
* Return 200 response immediately
* Move processing to background jobs
* Use async/await properly
* Optimize database queries
### Duplicate Events
**Check:**
* Retry logic triggering multiple deliveries
* Idempotency handling in your code
**Solution:**
* Implement event ID tracking
* Use database constraints for uniqueness
* Return 200 even for duplicates
## Next Steps
Use webhooks in workflows
Webhook API documentation
Monitor call events
Build automated workflows
Start with a simple webhook that logs events, then gradually add more complex processing logic as you become familiar with the event structure.