 ## Supported Providers
### Standard Email Providers
Supported providers:
* **Gmail**: Google Workspace or personal Gmail
* **Outlook**: Microsoft 365 or Outlook.com
* **Zoho**: Zoho Mail
* **GoDaddy**: GoDaddy Email
### Custom Email Provider
Use any SMTP server with custom configuration.
## Use Cases
* **Order Confirmations**: Send order details and receipts
* **Appointment Reminders**: Email appointment details
* **Support Tickets**: Share ticket numbers and status
* **Follow-up Emails**: Post-call summaries and next steps
* **Payment Receipts**: Confirm payment transactions
* **Welcome Emails**: Onboard new customers
* **Feedback Requests**: Collect customer feedback
* **Newsletter**: Send updates and announcements
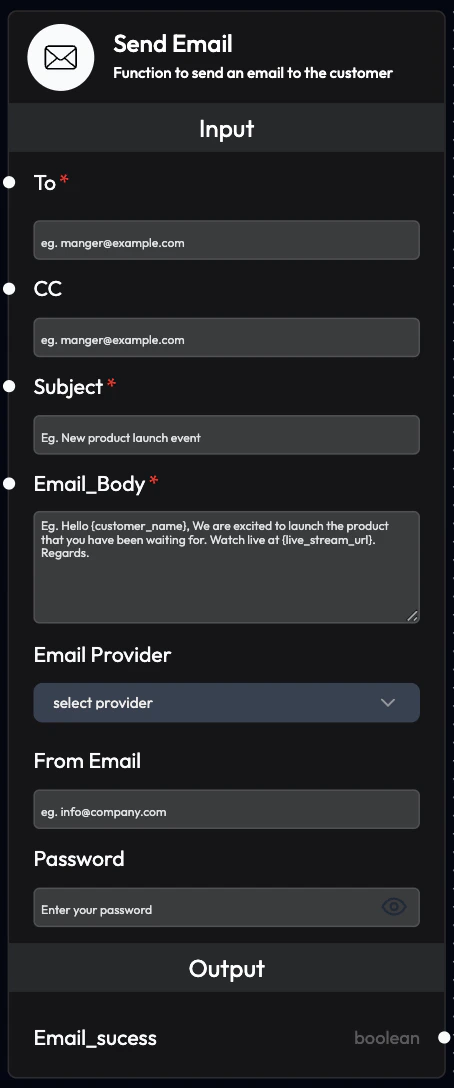
## Standard Provider Configuration
### Inputs
**To** (Required)
* Customer's email address
* Format: `email@example.com`
* Example: `john@example.com`
**CC**
* Additional email addresses to keep in loop
* Multiple entries separated by `;`
* Example: `support@company.com;manager@company.com`
**Subject** (Required)
* Subject line of the email
* Can be linked from AI Query Agent (dynamic generation)
* Can be manually written
* Data linkage overrides written text
**Example:**
```
Order Confirmation - ORD-12345
```
**AI-Generated Example:**
```
Link from AI Query Agent output:
"Follow-up: Your Support Ticket #TKT-789 Update"
```
**Email\_Body** (Required)
* Content of the email
* Can be linked from AI Query Agent (dynamic generation)
* Can be manually written
* Data linkage overrides written text
* Supports HTML formatting
**Example:**
```
Dear John,
Thank you for your order! Your order #ORD-12345 has been confirmed.
Order Details:
- Product: Premium Plan
- Amount: ₹2,499
- Delivery Date: Dec 15, 2025
Track your order: https://track.example.com/ORD-12345
Best regards,
SubVerse Team
```
**Email Provider** (Required)
* Select from: `Gmail`, `Outlook`, `Zoho`, `GoDaddy`
**From Email** (Required)
* Company email address to send from
* Must be valid email for selected provider
* Example: `support@company.com`
**Password** (Required)
* Email account password for authentication
* For Gmail: Use App Password (not regular password)
* Keep secure and don't share
### Outputs
**Email\_success**
* Confirms if email was successfully sent
* Values: `True` or `False`
* Use for conditional logic and error handling
## Custom Provider Configuration
### Additional Inputs
**SMTP Host** (Required)
* SMTP server hostname
* Example: `smtp.gmail.com`, `smtp.office365.com`
**SMTP Port** (Required)
* SMTP server port number
* Common ports: `465` (SSL), `587` (TLS), `25` (unencrypted)
* Example: `587`
**SMTP TLS Secure** (Required)
* TLS security protocol setting
* Options: `Enabled`, `Disabled`
* Recommended: `Enabled` for security
### Common SMTP Settings
**Gmail:**
```
SMTP Host: smtp.gmail.com
SMTP Port: 587
TLS Secure: Enabled
Note: Use App Password, not regular password
```
**Outlook/Office 365:**
```
SMTP Host: smtp.office365.com
SMTP Port: 587
TLS Secure: Enabled
```
**Zoho:**
```
SMTP Host: smtp.zoho.com
SMTP Port: 587
TLS Secure: Enabled
```
**GoDaddy:**
```
SMTP Host: smtpout.secureserver.net
SMTP Port: 465
TLS Secure: Enabled
```
## Configuration Examples
### Example 1: Simple Order Confirmation
```
To: john@example.com
CC:
Subject: Order Confirmation - ORD-12345
Email_Body: Dear John, your order has been confirmed...
Email Provider: Gmail
From Email: orders@company.com
Password: [app_password]
```
### Example 2: AI-Generated Follow-up
```
To: jane@example.com
CC: support@company.com
Subject: [Linked from AI Query Agent]
Email_Body: [Linked from AI Query Agent]
Email Provider: Outlook
From Email: support@company.com
Password: [password]
```
### Example 3: Custom SMTP
```
To: customer@example.com
CC:
Subject: Support Ticket Update
Email_Body: Your ticket has been updated...
Email Provider: Custom
From Email: support@company.com
Password: [password]
SMTP Host: smtp.customserver.com
SMTP Port: 587
TLS Secure: Enabled
```
## Email Content Best Practices
### Subject Lines
* **Clear and Specific**: State the purpose clearly
* **Include Reference**: Add order/ticket numbers
* **Personalize**: Use customer name when appropriate
* **Action-Oriented**: Indicate what's inside
**Good Examples:**
* "Your Order #12345 Has Shipped"
* "Appointment Reminder: Dec 10 at 3 PM"
* "Action Required: Complete Your Payment"
### Email Body
* **Greeting**: Start with personalized greeting
* **Purpose**: State reason for email upfront
* **Details**: Provide relevant information
* **Action**: Include clear call-to-action
* **Signature**: End with professional signature
### HTML Formatting
Use HTML for better presentation:
```html theme={null}
## Supported Providers
### Standard Email Providers
Supported providers:
* **Gmail**: Google Workspace or personal Gmail
* **Outlook**: Microsoft 365 or Outlook.com
* **Zoho**: Zoho Mail
* **GoDaddy**: GoDaddy Email
### Custom Email Provider
Use any SMTP server with custom configuration.
## Use Cases
* **Order Confirmations**: Send order details and receipts
* **Appointment Reminders**: Email appointment details
* **Support Tickets**: Share ticket numbers and status
* **Follow-up Emails**: Post-call summaries and next steps
* **Payment Receipts**: Confirm payment transactions
* **Welcome Emails**: Onboard new customers
* **Feedback Requests**: Collect customer feedback
* **Newsletter**: Send updates and announcements
## Standard Provider Configuration
### Inputs
**To** (Required)
* Customer's email address
* Format: `email@example.com`
* Example: `john@example.com`
**CC**
* Additional email addresses to keep in loop
* Multiple entries separated by `;`
* Example: `support@company.com;manager@company.com`
**Subject** (Required)
* Subject line of the email
* Can be linked from AI Query Agent (dynamic generation)
* Can be manually written
* Data linkage overrides written text
**Example:**
```
Order Confirmation - ORD-12345
```
**AI-Generated Example:**
```
Link from AI Query Agent output:
"Follow-up: Your Support Ticket #TKT-789 Update"
```
**Email\_Body** (Required)
* Content of the email
* Can be linked from AI Query Agent (dynamic generation)
* Can be manually written
* Data linkage overrides written text
* Supports HTML formatting
**Example:**
```
Dear John,
Thank you for your order! Your order #ORD-12345 has been confirmed.
Order Details:
- Product: Premium Plan
- Amount: ₹2,499
- Delivery Date: Dec 15, 2025
Track your order: https://track.example.com/ORD-12345
Best regards,
SubVerse Team
```
**Email Provider** (Required)
* Select from: `Gmail`, `Outlook`, `Zoho`, `GoDaddy`
**From Email** (Required)
* Company email address to send from
* Must be valid email for selected provider
* Example: `support@company.com`
**Password** (Required)
* Email account password for authentication
* For Gmail: Use App Password (not regular password)
* Keep secure and don't share
### Outputs
**Email\_success**
* Confirms if email was successfully sent
* Values: `True` or `False`
* Use for conditional logic and error handling
## Custom Provider Configuration
### Additional Inputs
**SMTP Host** (Required)
* SMTP server hostname
* Example: `smtp.gmail.com`, `smtp.office365.com`
**SMTP Port** (Required)
* SMTP server port number
* Common ports: `465` (SSL), `587` (TLS), `25` (unencrypted)
* Example: `587`
**SMTP TLS Secure** (Required)
* TLS security protocol setting
* Options: `Enabled`, `Disabled`
* Recommended: `Enabled` for security
### Common SMTP Settings
**Gmail:**
```
SMTP Host: smtp.gmail.com
SMTP Port: 587
TLS Secure: Enabled
Note: Use App Password, not regular password
```
**Outlook/Office 365:**
```
SMTP Host: smtp.office365.com
SMTP Port: 587
TLS Secure: Enabled
```
**Zoho:**
```
SMTP Host: smtp.zoho.com
SMTP Port: 587
TLS Secure: Enabled
```
**GoDaddy:**
```
SMTP Host: smtpout.secureserver.net
SMTP Port: 465
TLS Secure: Enabled
```
## Configuration Examples
### Example 1: Simple Order Confirmation
```
To: john@example.com
CC:
Subject: Order Confirmation - ORD-12345
Email_Body: Dear John, your order has been confirmed...
Email Provider: Gmail
From Email: orders@company.com
Password: [app_password]
```
### Example 2: AI-Generated Follow-up
```
To: jane@example.com
CC: support@company.com
Subject: [Linked from AI Query Agent]
Email_Body: [Linked from AI Query Agent]
Email Provider: Outlook
From Email: support@company.com
Password: [password]
```
### Example 3: Custom SMTP
```
To: customer@example.com
CC:
Subject: Support Ticket Update
Email_Body: Your ticket has been updated...
Email Provider: Custom
From Email: support@company.com
Password: [password]
SMTP Host: smtp.customserver.com
SMTP Port: 587
TLS Secure: Enabled
```
## Email Content Best Practices
### Subject Lines
* **Clear and Specific**: State the purpose clearly
* **Include Reference**: Add order/ticket numbers
* **Personalize**: Use customer name when appropriate
* **Action-Oriented**: Indicate what's inside
**Good Examples:**
* "Your Order #12345 Has Shipped"
* "Appointment Reminder: Dec 10 at 3 PM"
* "Action Required: Complete Your Payment"
### Email Body
* **Greeting**: Start with personalized greeting
* **Purpose**: State reason for email upfront
* **Details**: Provide relevant information
* **Action**: Include clear call-to-action
* **Signature**: End with professional signature
### HTML Formatting
Use HTML for better presentation:
```html theme={null}
Dear {{customer_name}},
Thank you for your order!
| Order ID: | {{order_id}} |
| Amount: | {{amount}} |
Best regards,
SubVerse Team