> ## Documentation Index
> Fetch the complete documentation index at: https://docs.subverseai.com/llms.txt
> Use this file to discover all available pages before exploring further.
# Upload Data Node
> Trigger workflows by uploading customer data files
## Overview
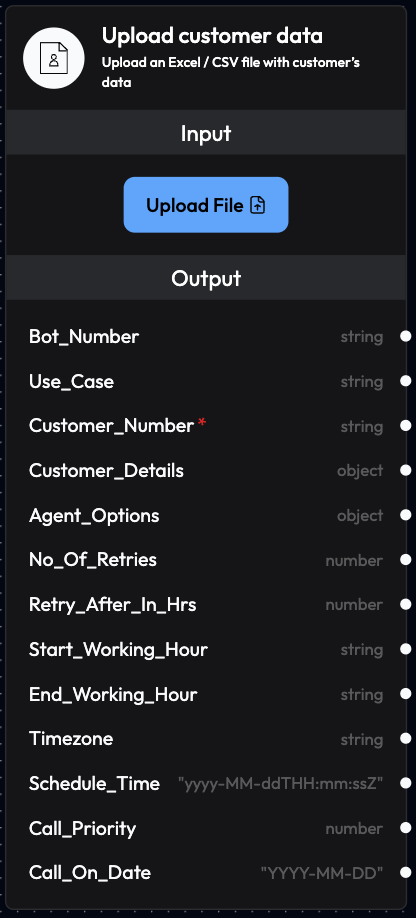
The Upload Data Node allows you to inject customer details into the system using file upload functionality. This is an alternative to the [Call API Node](/workflow/call-api-node) and is ideal for batch processing multiple customers at once.
 ## Use Cases
* **Bulk Campaigns**: Launch outbound calling campaigns for hundreds or thousands of customers
* **Data Migration**: Import customer lists from existing systems
* **Scheduled Campaigns**: Upload data for future campaign execution
* **Manual Triggers**: Non-technical users can trigger workflows without API knowledge
* **CSV/Excel Integration**: Work with data from spreadsheets and databases
## Inputs
### File Upload
Upload an Excel (.xlsx, .xls) or CSV (.csv) file containing customer details.
**File Requirements:**
* Maximum file size: 10MB
* Supported formats: Excel (.xlsx, .xls), CSV (.csv)
* First row must contain column headers
* UTF-8 encoding recommended
**Required Columns:**
* `Customer_Number`: Phone number with country code
* `Bot_Number`: Agent phone number with country code
* `Use_Case`: Agent name/identifier
**Optional Columns:**
* `Customer_Name`: Customer's name
* `Customer_Email`: Customer's email
* `Schedule_Time`: When to make the call (ISO format)
* `No_Of_Retries`: Number of retry attempts
* `Retries_After_In_Hrs`: Hours between retries
* `Start_Working_Hour`: Business hours start (HH:MM)
* `End_Working_Hour`: Business hours end (HH:MM)
* `Timezone`: Timezone for scheduling
* Any custom fields for personalization
**Example CSV Structure:**
```csv theme={null}
Customer_Number,Bot_Number,Use_Case,Customer_Name,Customer_Email,Schedule_Time
+91xxxxxxxxxx,+91xxxxxxxxxx,order_confirmation,John Doe,john@example.com,2025-12-10T10:00:00Z
+91xxxxxxxxxx,+91xxxxxxxxxx,order_confirmation,Jane Smith,jane@example.com,2025-12-10T10:30:00Z
+91xxxxxxxxxx,+91xxxxxxxxxx,payment_reminder,Bob Johnson,bob@example.com,2025-12-10T11:00:00Z
```
## Outputs
The Upload Data Node provides the following outputs for each row in your file:
### **Bot\_Number**
* Phone number the voice agent will use to make or receive calls
* Taken from the `Bot_Number` column in your file
* Format: Include country code (e.g., +91xxxxxxxxxx)
### **Use\_Case**
* Defines which voice agent will be used for the call
* Taken from the `Use_Case` column
* Must match an existing agent in your account
### **Customer\_Number**
* Customer's phone number for the call
* Taken from the `Customer_Number` column
* Format: Include country code (e.g., +91xxxxxxxxxx)
### **Customer\_Details**
* Customer information compiled from all columns in the row
* Automatically converted to JSON format
* Includes all custom columns you've added
**Example Output:**
```json theme={null}
{
"name": "John Doe",
"email": "john@example.com",
"order_id": "ORD-12345",
"product": "Premium Plan"
}
```
### **Agent\_Options**
* Override default agent settings for specific calls
* Can be specified in the file or left empty
* Allows per-call customization
### **No\_Of\_Retries**
* Number of retry attempts if the call fails
* Taken from the `No_Of_Retries` column (if provided)
* Default: 0 (no retries)
### **Retries\_After\_In\_Hrs**
* Time interval between retry attempts (in hours)
* Taken from the `Retries_After_In_Hrs` column (if provided)
* Example: 2 (retry after 2 hours)
### **Start\_Working\_Hour**
* Start of business hours in 24-hour format (HH:MM)
* Taken from the `Start_Working_Hour` column (if provided)
* Example: "09:00"
### **End\_Working\_Hour**
* End of business hours in 24-hour format (HH:MM)
* Taken from the `End_Working_Hour` column (if provided)
* Example: "18:00"
### **Timezone**
* Timezone for working hours calculation
* Taken from the `Timezone` column (if provided)
* Default: Asia/Kolkata
## How to Use
### Step 1: Prepare Your Data File
1. Create a spreadsheet with your customer data
2. Ensure all required columns are present
3. Validate phone numbers include country codes
4. Format dates in ISO 8601 format
5. Save as CSV or Excel file
### Step 2: Upload to SubVerse
1. Navigate to your workflow in the dashboard
2. Add or click on the Upload Data Node
3. Click the upload button
4. Select your prepared file
5. Review the preview of parsed data
6. Confirm and upload
### Step 3: Workflow Execution
* Each row in your file triggers the workflow
* Calls are scheduled according to `Schedule_Time` column
* Working hours and retry logic are applied automatically
* Monitor progress in Call History section
## File Format Examples
### Basic Campaign File
```csv theme={null}
Customer_Number,Bot_Number,Use_Case,Customer_Name
+919876543210,+919898989898,sales_call,John Doe
+919876543211,+919898989898,sales_call,Jane Smith
+919876543212,+919898989898,sales_call,Bob Johnson
```
### Advanced Campaign with Scheduling
```csv theme={null}
Customer_Number,Bot_Number,Use_Case,Customer_Name,Schedule_Time,No_Of_Retries,Timezone
+919876543210,+919898989898,appointment_reminder,John Doe,2025-12-10T09:00:00Z,2,Asia/Kolkata
+919876543211,+919898989898,appointment_reminder,Jane Smith,2025-12-10T10:00:00Z,2,Asia/Kolkata
```
### E-commerce Order Confirmation
```csv theme={null}
Customer_Number,Bot_Number,Use_Case,Customer_Name,Order_ID,Order_Amount,Delivery_Date
+919876543210,+919898989898,order_confirmation,John Doe,ORD-001,₹2499,2025-12-15
+919876543211,+919898989898,order_confirmation,Jane Smith,ORD-002,₹3999,2025-12-16
```
## Best Practices
### Data Preparation
* **Validate Phone Numbers**: Ensure all numbers include country codes
* **Clean Data**: Remove duplicates and invalid entries
* **Test Small**: Upload a small test file first (5-10 rows)
* **Consistent Formatting**: Use the same format for all rows
### File Organization
* **Clear Headers**: Use descriptive column names
* **Logical Order**: Arrange columns in a logical sequence
* **Documentation**: Keep a template file for future uploads
* **Backup**: Save original files before uploading
### Scheduling
* **Spread Out Calls**: Don't schedule all calls at the same time
* **Respect Time Zones**: Consider customer locations
* **Business Hours**: Use working hour constraints
* **Retry Logic**: Set appropriate retry parameters
### Performance
* **Batch Size**: Upload files with 100-1000 rows for optimal performance
* **Large Campaigns**: Split very large campaigns into multiple files
* **Monitor Progress**: Check Call History regularly
* **Error Handling**: Review failed calls and retry if needed
## Common Issues and Solutions
### Phone Number Format Errors
**Issue**: Calls failing due to invalid phone numbers
**Solution**:
* Always include country code (e.g., +91 for India)
* Remove spaces and special characters
* Use format: +\[country code]\[number]
### Missing Required Columns
**Issue**: Upload fails due to missing columns
**Solution**:
* Ensure `Customer_Number`, `Bot_Number`, and `Use_Case` columns exist
* Check spelling of column names
* Review file preview before confirming upload
### Encoding Issues
**Issue**: Special characters appear incorrectly
**Solution**:
* Save file with UTF-8 encoding
* Avoid special characters in critical fields
* Test with a small sample first
### Schedule Time Format
**Issue**: Calls not scheduled at correct time
**Solution**:
* Use ISO 8601 format: `YYYY-MM-DDTHH:MM:SSZ`
* Include timezone in the format or use Timezone column
* Validate dates are in the future
## Monitoring Uploaded Campaigns
After uploading your file:
1. **View Progress**: Check Call History for execution status
2. **Track Success Rate**: Monitor completed vs failed calls
3. **Review Transcripts**: Listen to sample calls for quality
4. **Analyze Results**: Export data for reporting
5. **Optimize**: Adjust agent settings based on performance
## Comparison: Upload Data vs Call API
| Feature | Upload Data Node | Call API Node |
| ------------------- | --------------------- | ---------------------- |
| **Best For** | Batch campaigns | Real-time triggers |
| **Technical Skill** | Low (no coding) | Medium (API knowledge) |
| **Volume** | Hundreds to thousands | Single or few calls |
| **Automation** | Manual upload | Fully automated |
| **Integration** | Standalone | System integration |
| **Scheduling** | File-based | Programmatic |
## Next Steps
Configure outbound calling behavior
Learn about API-based triggering
Set up automated follow-ups
Monitor campaign performance
Start with a small test file (10-20 rows) to verify your workflow configuration before uploading large campaigns.
Ensure you have consent to call all numbers in your upload file. Comply with local telemarketing regulations and do-not-call lists.
## Use Cases
* **Bulk Campaigns**: Launch outbound calling campaigns for hundreds or thousands of customers
* **Data Migration**: Import customer lists from existing systems
* **Scheduled Campaigns**: Upload data for future campaign execution
* **Manual Triggers**: Non-technical users can trigger workflows without API knowledge
* **CSV/Excel Integration**: Work with data from spreadsheets and databases
## Inputs
### File Upload
Upload an Excel (.xlsx, .xls) or CSV (.csv) file containing customer details.
**File Requirements:**
* Maximum file size: 10MB
* Supported formats: Excel (.xlsx, .xls), CSV (.csv)
* First row must contain column headers
* UTF-8 encoding recommended
**Required Columns:**
* `Customer_Number`: Phone number with country code
* `Bot_Number`: Agent phone number with country code
* `Use_Case`: Agent name/identifier
**Optional Columns:**
* `Customer_Name`: Customer's name
* `Customer_Email`: Customer's email
* `Schedule_Time`: When to make the call (ISO format)
* `No_Of_Retries`: Number of retry attempts
* `Retries_After_In_Hrs`: Hours between retries
* `Start_Working_Hour`: Business hours start (HH:MM)
* `End_Working_Hour`: Business hours end (HH:MM)
* `Timezone`: Timezone for scheduling
* Any custom fields for personalization
**Example CSV Structure:**
```csv theme={null}
Customer_Number,Bot_Number,Use_Case,Customer_Name,Customer_Email,Schedule_Time
+91xxxxxxxxxx,+91xxxxxxxxxx,order_confirmation,John Doe,john@example.com,2025-12-10T10:00:00Z
+91xxxxxxxxxx,+91xxxxxxxxxx,order_confirmation,Jane Smith,jane@example.com,2025-12-10T10:30:00Z
+91xxxxxxxxxx,+91xxxxxxxxxx,payment_reminder,Bob Johnson,bob@example.com,2025-12-10T11:00:00Z
```
## Outputs
The Upload Data Node provides the following outputs for each row in your file:
### **Bot\_Number**
* Phone number the voice agent will use to make or receive calls
* Taken from the `Bot_Number` column in your file
* Format: Include country code (e.g., +91xxxxxxxxxx)
### **Use\_Case**
* Defines which voice agent will be used for the call
* Taken from the `Use_Case` column
* Must match an existing agent in your account
### **Customer\_Number**
* Customer's phone number for the call
* Taken from the `Customer_Number` column
* Format: Include country code (e.g., +91xxxxxxxxxx)
### **Customer\_Details**
* Customer information compiled from all columns in the row
* Automatically converted to JSON format
* Includes all custom columns you've added
**Example Output:**
```json theme={null}
{
"name": "John Doe",
"email": "john@example.com",
"order_id": "ORD-12345",
"product": "Premium Plan"
}
```
### **Agent\_Options**
* Override default agent settings for specific calls
* Can be specified in the file or left empty
* Allows per-call customization
### **No\_Of\_Retries**
* Number of retry attempts if the call fails
* Taken from the `No_Of_Retries` column (if provided)
* Default: 0 (no retries)
### **Retries\_After\_In\_Hrs**
* Time interval between retry attempts (in hours)
* Taken from the `Retries_After_In_Hrs` column (if provided)
* Example: 2 (retry after 2 hours)
### **Start\_Working\_Hour**
* Start of business hours in 24-hour format (HH:MM)
* Taken from the `Start_Working_Hour` column (if provided)
* Example: "09:00"
### **End\_Working\_Hour**
* End of business hours in 24-hour format (HH:MM)
* Taken from the `End_Working_Hour` column (if provided)
* Example: "18:00"
### **Timezone**
* Timezone for working hours calculation
* Taken from the `Timezone` column (if provided)
* Default: Asia/Kolkata
## How to Use
### Step 1: Prepare Your Data File
1. Create a spreadsheet with your customer data
2. Ensure all required columns are present
3. Validate phone numbers include country codes
4. Format dates in ISO 8601 format
5. Save as CSV or Excel file
### Step 2: Upload to SubVerse
1. Navigate to your workflow in the dashboard
2. Add or click on the Upload Data Node
3. Click the upload button
4. Select your prepared file
5. Review the preview of parsed data
6. Confirm and upload
### Step 3: Workflow Execution
* Each row in your file triggers the workflow
* Calls are scheduled according to `Schedule_Time` column
* Working hours and retry logic are applied automatically
* Monitor progress in Call History section
## File Format Examples
### Basic Campaign File
```csv theme={null}
Customer_Number,Bot_Number,Use_Case,Customer_Name
+919876543210,+919898989898,sales_call,John Doe
+919876543211,+919898989898,sales_call,Jane Smith
+919876543212,+919898989898,sales_call,Bob Johnson
```
### Advanced Campaign with Scheduling
```csv theme={null}
Customer_Number,Bot_Number,Use_Case,Customer_Name,Schedule_Time,No_Of_Retries,Timezone
+919876543210,+919898989898,appointment_reminder,John Doe,2025-12-10T09:00:00Z,2,Asia/Kolkata
+919876543211,+919898989898,appointment_reminder,Jane Smith,2025-12-10T10:00:00Z,2,Asia/Kolkata
```
### E-commerce Order Confirmation
```csv theme={null}
Customer_Number,Bot_Number,Use_Case,Customer_Name,Order_ID,Order_Amount,Delivery_Date
+919876543210,+919898989898,order_confirmation,John Doe,ORD-001,₹2499,2025-12-15
+919876543211,+919898989898,order_confirmation,Jane Smith,ORD-002,₹3999,2025-12-16
```
## Best Practices
### Data Preparation
* **Validate Phone Numbers**: Ensure all numbers include country codes
* **Clean Data**: Remove duplicates and invalid entries
* **Test Small**: Upload a small test file first (5-10 rows)
* **Consistent Formatting**: Use the same format for all rows
### File Organization
* **Clear Headers**: Use descriptive column names
* **Logical Order**: Arrange columns in a logical sequence
* **Documentation**: Keep a template file for future uploads
* **Backup**: Save original files before uploading
### Scheduling
* **Spread Out Calls**: Don't schedule all calls at the same time
* **Respect Time Zones**: Consider customer locations
* **Business Hours**: Use working hour constraints
* **Retry Logic**: Set appropriate retry parameters
### Performance
* **Batch Size**: Upload files with 100-1000 rows for optimal performance
* **Large Campaigns**: Split very large campaigns into multiple files
* **Monitor Progress**: Check Call History regularly
* **Error Handling**: Review failed calls and retry if needed
## Common Issues and Solutions
### Phone Number Format Errors
**Issue**: Calls failing due to invalid phone numbers
**Solution**:
* Always include country code (e.g., +91 for India)
* Remove spaces and special characters
* Use format: +\[country code]\[number]
### Missing Required Columns
**Issue**: Upload fails due to missing columns
**Solution**:
* Ensure `Customer_Number`, `Bot_Number`, and `Use_Case` columns exist
* Check spelling of column names
* Review file preview before confirming upload
### Encoding Issues
**Issue**: Special characters appear incorrectly
**Solution**:
* Save file with UTF-8 encoding
* Avoid special characters in critical fields
* Test with a small sample first
### Schedule Time Format
**Issue**: Calls not scheduled at correct time
**Solution**:
* Use ISO 8601 format: `YYYY-MM-DDTHH:MM:SSZ`
* Include timezone in the format or use Timezone column
* Validate dates are in the future
## Monitoring Uploaded Campaigns
After uploading your file:
1. **View Progress**: Check Call History for execution status
2. **Track Success Rate**: Monitor completed vs failed calls
3. **Review Transcripts**: Listen to sample calls for quality
4. **Analyze Results**: Export data for reporting
5. **Optimize**: Adjust agent settings based on performance
## Comparison: Upload Data vs Call API
| Feature | Upload Data Node | Call API Node |
| ------------------- | --------------------- | ---------------------- |
| **Best For** | Batch campaigns | Real-time triggers |
| **Technical Skill** | Low (no coding) | Medium (API knowledge) |
| **Volume** | Hundreds to thousands | Single or few calls |
| **Automation** | Manual upload | Fully automated |
| **Integration** | Standalone | System integration |
| **Scheduling** | File-based | Programmatic |
## Next Steps
Configure outbound calling behavior
Learn about API-based triggering
Set up automated follow-ups
Monitor campaign performance
Start with a small test file (10-20 rows) to verify your workflow configuration before uploading large campaigns.
Ensure you have consent to call all numbers in your upload file. Comply with local telemarketing regulations and do-not-call lists.