Overview
The Send Email Node allows you to send automated emails to customers using standard email providers (Gmail, Outlook, Zoho, GoDaddy) or custom SMTP servers.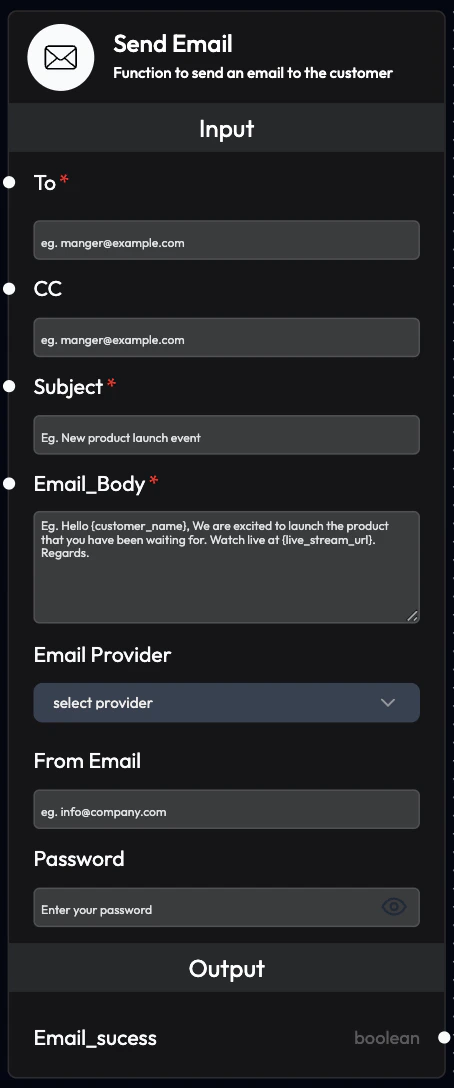
Supported Providers
Standard Email Providers
Supported providers:- Gmail: Google Workspace or personal Gmail
- Outlook: Microsoft 365 or Outlook.com
- Zoho: Zoho Mail
- GoDaddy: GoDaddy Email
Custom Email Provider
Use any SMTP server with custom configuration.Use Cases
- Order Confirmations: Send order details and receipts
- Appointment Reminders: Email appointment details
- Support Tickets: Share ticket numbers and status
- Follow-up Emails: Post-call summaries and next steps
- Payment Receipts: Confirm payment transactions
- Welcome Emails: Onboard new customers
- Feedback Requests: Collect customer feedback
- Newsletter: Send updates and announcements
Standard Provider Configuration
Inputs
To (Required)- Customer’s email address
- Format:
[email protected] - Example:
[email protected]
- Additional email addresses to keep in loop
- Multiple entries separated by
; - Example:
[email protected];[email protected]
- Subject line of the email
- Can be linked from AI Query Agent (dynamic generation)
- Can be manually written
- Data linkage overrides written text
- Content of the email
- Can be linked from AI Query Agent (dynamic generation)
- Can be manually written
- Data linkage overrides written text
- Supports HTML formatting
- Select from:
Gmail,Outlook,Zoho,GoDaddy
- Company email address to send from
- Must be valid email for selected provider
- Example:
[email protected]
- Email account password for authentication
- For Gmail: Use App Password (not regular password)
- Keep secure and don’t share
Outputs
Email_success- Confirms if email was successfully sent
- Values:
TrueorFalse - Use for conditional logic and error handling
Custom Provider Configuration
Additional Inputs
SMTP Host (Required)- SMTP server hostname
- Example:
smtp.gmail.com,smtp.office365.com
- SMTP server port number
- Common ports:
465(SSL),587(TLS),25(unencrypted) - Example:
587
- TLS security protocol setting
- Options:
Enabled,Disabled - Recommended:
Enabledfor security
Common SMTP Settings
Gmail:Configuration Examples
Example 1: Simple Order Confirmation
Example 2: AI-Generated Follow-up
Example 3: Custom SMTP
Email Content Best Practices
Subject Lines
- Clear and Specific: State the purpose clearly
- Include Reference: Add order/ticket numbers
- Personalize: Use customer name when appropriate
- Action-Oriented: Indicate what’s inside
- “Your Order #12345 Has Shipped”
- “Appointment Reminder: Dec 10 at 3 PM”
- “Action Required: Complete Your Payment”
Email Body
- Greeting: Start with personalized greeting
- Purpose: State reason for email upfront
- Details: Provide relevant information
- Action: Include clear call-to-action
- Signature: End with professional signature
HTML Formatting
Use HTML for better presentation:Workflow Integration
Common Patterns
Pattern 1: Post-Call SummaryProvider-Specific Setup
Gmail Setup
- Enable 2-Factor Authentication: Required for App Passwords
- Generate App Password:
- Go to Google Account → Security
- Select “App passwords”
- Generate password for “Mail”
- Use App Password: Use generated password, not regular password
Outlook/Office 365 Setup
- Use Account Password: Regular password works
- Enable SMTP: Ensure SMTP is enabled in account settings
- Modern Authentication: May require admin approval for organization accounts
Zoho Setup
- Use Account Password: Regular password works
- Enable IMAP/SMTP: In Settings → Mail Accounts
- App-Specific Password: Generate if 2FA is enabled
Best Practices
Authentication
- App Passwords: Use app-specific passwords when available
- Secure Storage: Never hardcode passwords in workflows
- Regular Rotation: Change passwords periodically
- Least Privilege: Use dedicated email accounts for automation
Content
- Personalization: Use customer data for personalized content
- Clarity: Keep messages clear and concise
- Branding: Maintain consistent brand voice
- Mobile-Friendly: Ensure emails look good on mobile devices
Deliverability
- Valid From Address: Use legitimate business email
- SPF/DKIM: Configure email authentication records
- Avoid Spam Triggers: Don’t use all caps, excessive exclamation marks
- Test: Send test emails before launching campaigns
Compliance
- Opt-In: Only email customers who opted in
- Unsubscribe: Include unsubscribe link for marketing emails
- Privacy: Respect customer data privacy
- CAN-SPAM: Comply with email regulations
Monitoring
Track Email Performance
Metrics:- Delivery Rate: Successfully sent emails
- Bounce Rate: Failed deliveries
- Open Rate: Emails opened by recipients (if tracking enabled)
- Click Rate: Links clicked in emails
Troubleshooting
Email Not Sending Possible Causes:- Invalid credentials
- SMTP settings incorrect
- Email provider blocking
- Network issues
- Verify email and password
- Check SMTP host and port
- Review provider security settings
- Test with different provider
- Missing SPF/DKIM records
- Spam-like content
- High sending volume
- Poor sender reputation
- Configure email authentication
- Improve email content
- Warm up email account
- Use reputable email provider
Next Steps
AI Query Agent Node
Generate dynamic email content
Send WhatsApp Node
Send WhatsApp messages
Voice Agent Node
Make voice calls
Webhook Node
Integrate with external systems